How the driver app works
Last updated: August 28, 2026
Every delivery you run in the app follows the same shape underneath, whether it shows up as a single stop or one leg of a longer route: you get the work, you go to a place, you do what's needed there, and you mark it done. This article is a closer look at that shape — the path a stop takes from start to finish, how the app decides what proof it needs from you at each one, the two different layouts your work can show up in, and where the line falls between what your operator has already decided and what's left for you to do in the field.
Note
What you see on your screen depends on what your operator has turned on for your organization. Some of what's described below — certain proof steps, in-app navigation, the ability to skip or decline work — varies from one operator to the next. If something here doesn't match what's in front of you, that's expected; check with your operator.
The stop lifecycle
Before any of that can happen, you have to be reachable. Flip your status to Active and the app starts showing you work; go Inactive and it stops. Being Active is what tells the app — and your operator — that you're available right now, so it's the first thing to do at the start of a shift and the last thing to undo at the end of one.
From there, a single piece of work moves through the same sequence every time:
- Accept the work. Something new shows up either as a job you accept outright, or — depending on how your operator has things set up — as a timed offer with a countdown, which you can accept or let expire. Either way, accepting is what moves it from waiting-for-you into something you're actually running.
- Start the route. If your work is a sequence of stops, you start the whole route before working the first one. If it's a single delivery, this step and the next collapse into one — there's nothing to "start" beyond getting moving.
- For each stop, the same small loop repeats: - Navigate to the address, either inside the app or handed off to whatever maps app you've set as your default. - Arrive. The app expects you to actually be near the stop before it lets you move forward — more on that in a moment. - Work the stop. At a pickup, that usually means confirming or scanning the items you're taking. At a drop-off, it means whatever proof that stop requires — a photo, a signature, a check of some kind — which is the whole subject of the next section. - Complete the stop. Once everything required is done, a Complete button unlocks and you tap it, closing that stop out and moving you to the next one.
- Repeat the navigate-arrive-work-complete loop for every stop on the route, in the order the app gives you.
- End the route. After the last stop, you check out — confirming everything's done, and on some setups logging an odometer reading or leaving quick feedback on how the run went.
That's the lifecycle end to end, and it holds regardless of whether you're running one delivery or twenty stops back to back.
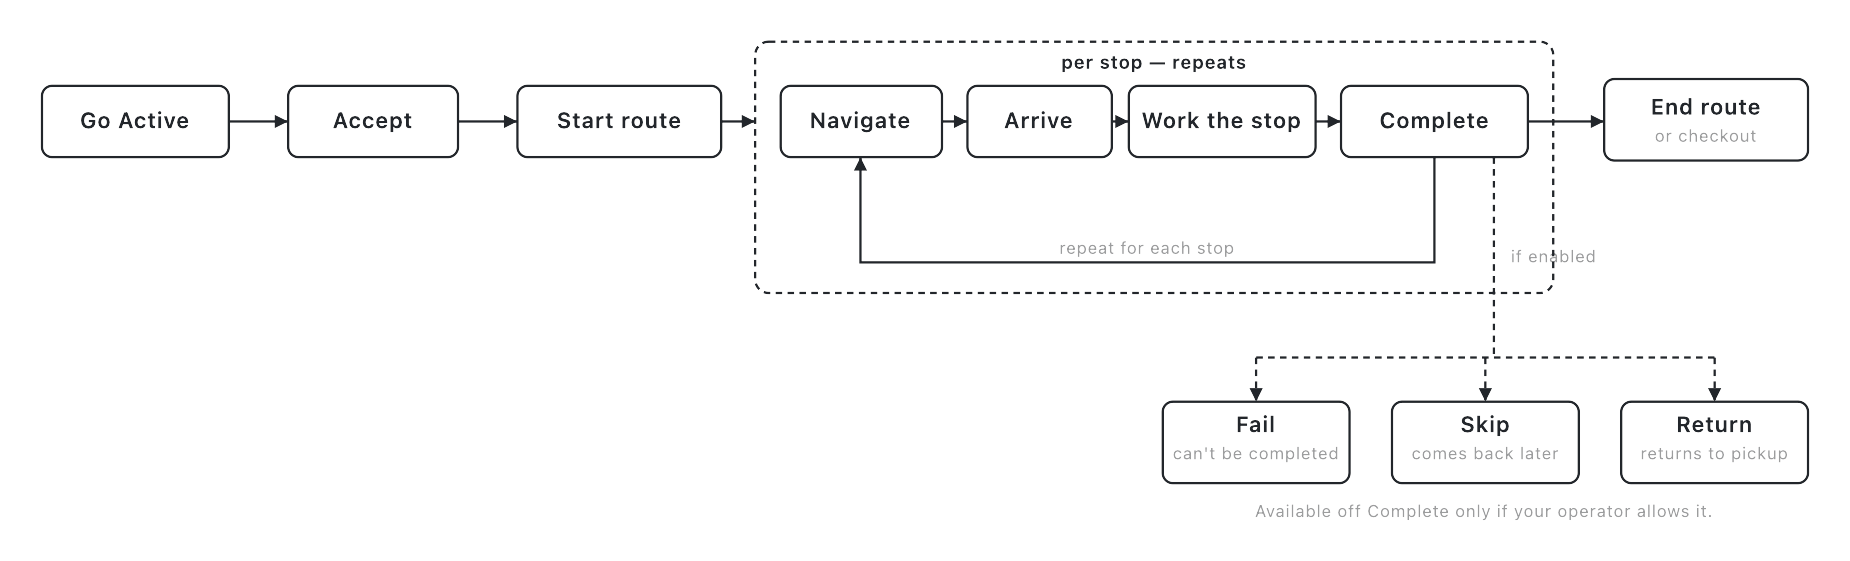
Completion isn't the only way a stop ends, though. A stop can also fork off the "work the stop" step into one of a few other outcomes, if your operator allows them:
- Fail a stop that genuinely can't be completed — a damaged package, a business that's closed, a customer who isn't there — by picking a reason from a short list. Failing a stop fails the whole delivery for that stop; there's no partial-fail-then-retry.
- Skip a stop for now rather than fail it outright, and come back to it later in the same route. A skipped stop stays open until you resume it or the route ends.
- Return items you couldn't hand off — because a stop failed, or a recipient refused them — which turns into its own stop back at the pickup location, so the items make it back to where they came from.
One thing every path shares: the app checks that you're actually near a stop's address before it lets you complete it, so completion always reflects something that happened at the right place, not just a tap from wherever you happen to be.
Proof of delivery is set by your operator
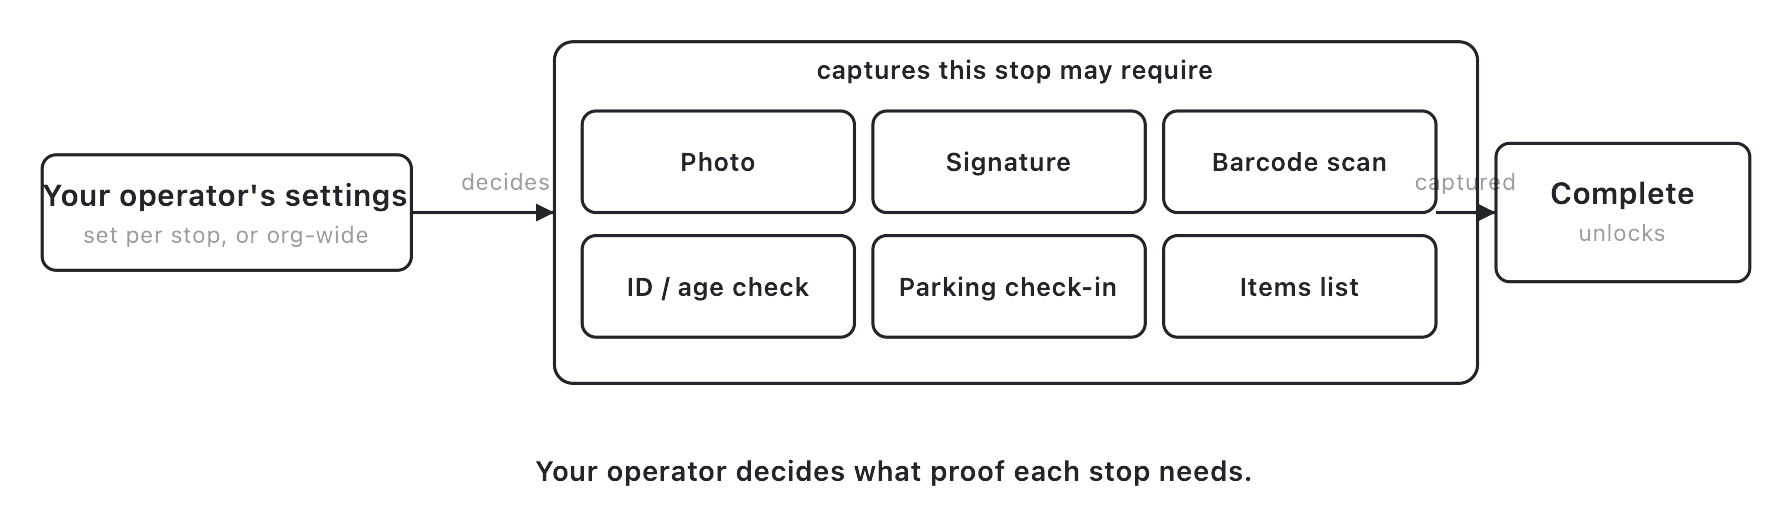
Every stop that needs proof needs a specific kind of proof — and that's not something you get to choose. Your operator decides, stop by stop, what counts as done: a photo, a signature, a barcode scan, a written note, an ID or age check, or checking in with a parking spot number. You don't pick which of those apply to a given stop; the app simply shows you what that stop needs, and your job is to capture it.
Six kinds of capture exist across the app, though any single stop typically only asks for one or two of them:
- Photo — of the package at pickup, or of the completed delivery at drop-off.
- Signature — from whoever's handing off or receiving the package.
- Barcode scan — matching an item to what's expected at that stop, usually alongside working through the item list.
- Notes — a free-text field that's always available if you want to leave context, whether or not the stop requires one.
- ID or age check — for stops where what's being delivered is age-restricted, confirming identity before you can complete.
- Parking check-in — logging where you've parked, when a stop asks for it.
Whatever mix of these a stop needs is decided ahead of time — by your operator, per stop — and the Complete button simply won't unlock until you've captured all of it. If a required photo is missing, or a signature hasn't been collected, completion stays locked; there's no way to push a stop through without satisfying what it's asking for. Combine that with the proximity check from the previous section, and completing a stop always means two things are both true: you were actually there, and you captured what that stop required.
Two situations are worth calling out because they change what's required on the fly, if your operator has enabled them: marking a package left unattended when no one's available to receive it usually requires a delivery photo as proof it was left safely, and handing a package to someone other than the named recipient usually requires an ID check on whoever actually took it. Both are still proof requirements — they just shift what the app asks for based on how the drop-off actually went.
Two ways your work can look
Everything above describes the same underlying rhythm, but not everyone sees it packaged the same way. Depending on how your operator has set things up, your work shows up in one of two layouts:
- A route of stops — the layout most operators use today. Your work for a shift is grouped into a single route, shown as a list of stops you work through one after another, with the route started and ended as a whole and each stop worked individually inside it. This is the layout the stop lifecycle above describes directly, and the one this article assumes unless it says otherwise.
- Individual deliveries — an older layout some operators still use, where each delivery is its own self-contained job rather than one stop in a shared route. You accept and complete deliveries one at a time instead of moving through a route list, but the actual work at each one — navigate, arrive, satisfy proof of delivery, complete — is the same.
You're not choosing between these two, and you won't see both at once: it's one app, and which layout you get is determined entirely by your operator's setup. If your screen looks like a list of individual jobs rather than a single route with stops, that's not a different app or a missing feature — it's the same experience in the older layout. Nothing in this article's guidance about proof of delivery, exceptions, or completion changes between the two; only the shape of the list around it does.
What your operator controls vs what you do
It's worth being explicit about where the line falls, because a lot of what shapes your day in the app was decided somewhere you'll never see. Your operator sets:
- What proof each stop requires — which of the six capture types apply, and whether any of them are mandatory for every stop or only certain ones.
- What forms you fill out — any check-in or check-out forms that appear at the start or end of a route, along with their fields, are built by your operator ahead of time. You fill them in; you don't design them.
- How navigation works — whether you get in-app turn-by-turn directions or the app hands you off to your phone's own maps app, and whether you can change that default yourself.
- Which actions are available to you — whether you're allowed to decline offered work, skip a stop, or unassign a delivery back to the pool are all settings your operator turns on or off; they're not universal abilities every driver has everywhere.
What's left to you is running the work in front of you: accepting it, getting to each stop, satisfying whatever it asks for, and completing it — or working through the fail/skip/return paths when a stop genuinely can't go as planned. You don't configure any of the settings above, the same way you don't build the routes you're handed or decide which of your operator's providers should carry a given order — those are calls made elsewhere, before the work ever reaches your phone. The app is where configuration becomes action: whatever your operator has set, you're the one who carries it out in the field.
Nash dispatches the work; the provider or your operator's own fleet — you — performs the delivery.