How dispatch strategies work
Last updated: September 4, 2026
A dispatch strategy is one saved ruleset you build once and reuse — attached to an order, set as your org's default, or applied by a workflow. This article is about what that ruleset does when a dispatch happens — how it orders the providers you allow, what "reliability" means, every setting you can turn, and what happens automatically when a provider falls through. For the strategy object itself, see dispatch strategies; for the field-by-field editor, see dispatch strategy settings. And for how a dispatch decides which providers and prices are in the running, see how dispatch works — this article picks up right after that, once eligible quotes exist.
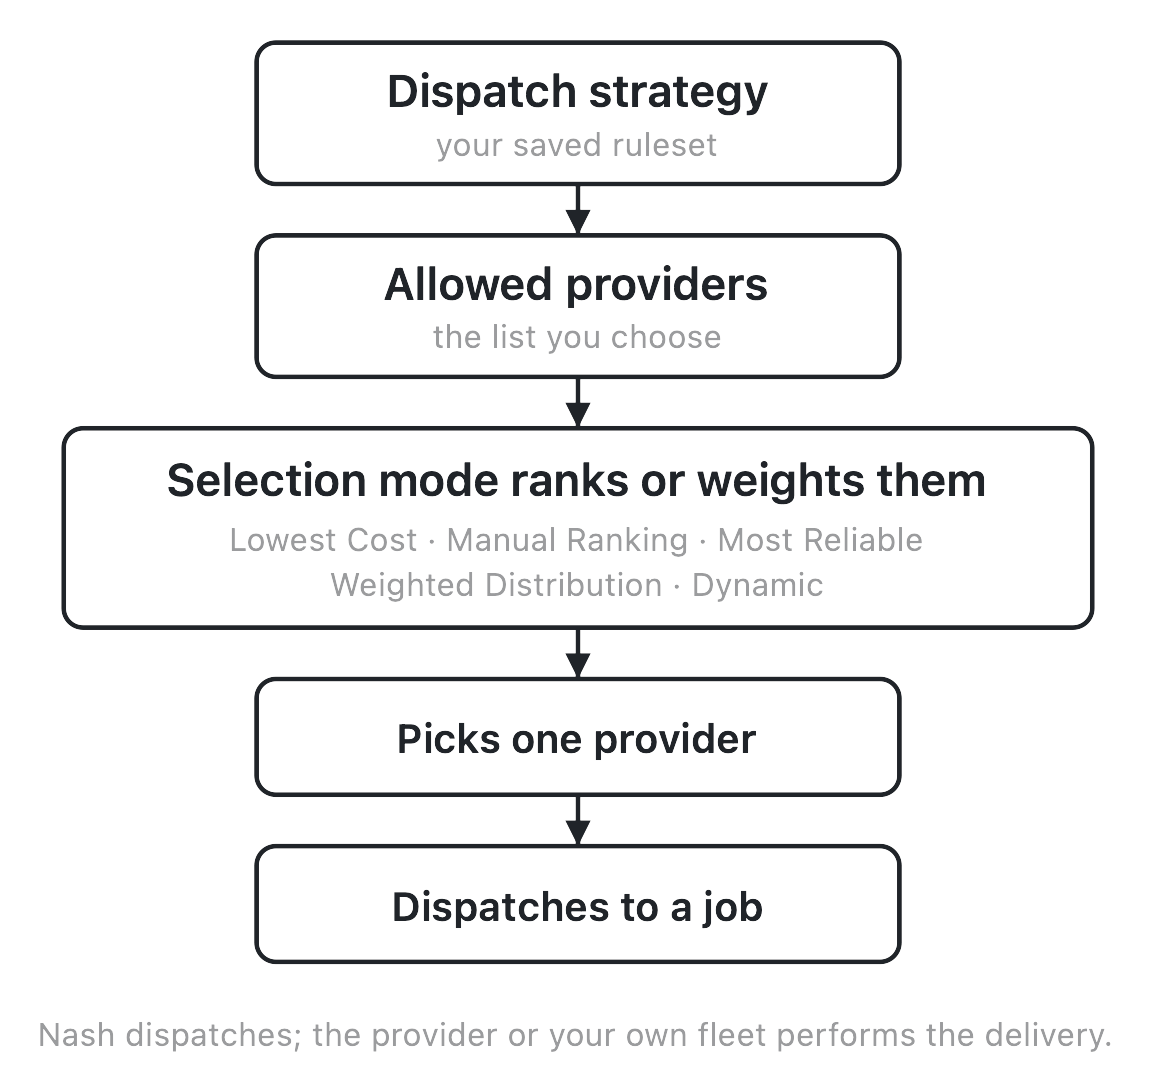
Nash dispatches; the provider or your own fleet performs the delivery. A strategy decides who gets the dispatch and what happens if that falls through — it never carries the delivery itself.
How it works
Every dispatch strategy works from two ingredients. The first is yours: the allowed-provider list — the providers, or your own fleet, it may consider at all. The second isn't yours to set here: the eligible quotes the rest of your Nash configuration produced for this order (which contracts qualified, at what price). A strategy never sees a provider you didn't add, or a quote that didn't come back eligible; every time it runs, it takes the overlap of the two and picks a winner.
Walk through a single dispatch to see where the strategy fits:
- An order dispatches carrying a strategy — attached on the order, from your org's default when the order names none, or by a workflow's "Set dispatch strategy" action.
- Nash gathers quotes from eligible providers and your own fleet. That eligibility work — zones, contracts, prices — belongs to how dispatch works, not to the strategy.
- The strategy filters the quotes. A quote survives only if it's from a provider on your allowed list, isn't blocked, sits at or below your Maximum Delivery Fee (if set), and supports any capability you required.
- The selection mode orders the survivors into a ranked candidate list — the strategy's core decision.
- Nash tries the top candidates in order — up to three attempts. If a provider can't take the work it falls to the next; if none accept, the order lands in Needs Attention.
The key thing to hold onto: the mode never widens the pool. It only orders the allow-listed, in-cap, unblocked quotes that dispatch already made eligible. Adding a provider doesn't guarantee it gets picked; leaving one out means the strategy never considers it, however good a price it quoted.
The five selection modes
The mode you choose under Provider Selection decides how the strategy orders the providers you've allowed. Two modes are deterministic — the same inputs always produce the same order. Three are probabilistic — they push the pick toward an outcome over many deliveries without guaranteeing the top-ranked provider wins any single one.
| Mode | Deterministic? | How it orders your allowed quotes |
|---|---|---|
| Lowest Cost (default) | Deterministic | Sorts surviving quotes by price, cheapest first. Ties break by an internal Nash provider ranking, then soonest drop-off ETA. |
| Manual Ranking | Deterministic | Walks your allowed-provider list in the order you arranged it and takes the first provider that returned a valid quote. |
| Most Reliable | Probabilistic | Favors providers with a stronger reliability score for that pickup area — biased toward reliability, not a lock on the single most-reliable one. |
| Weighted Distribution | Probabilistic | Distributes volume across your allowed providers by the per-provider percentages you set (must sum to 100). |
| Dynamic | Probabilistic | Balances reliability against price with a tunable dial. Gated — covered on its own below. |
That split is easy to misread: a 70/30 Weighted Distribution shows up as roughly 70/30 across many deliveries, not as a promise on any single one. Only Lowest Cost and Manual Ranking behave like a strict, repeatable order.
Note
Manual Ranking needs a non-empty allowed list, and only Manual Ranking lets you reorder it. Drag-to-reorder is active only in Manual Ranking; the per-provider percentage fields appear only in Weighted Distribution. In the other modes the allowed list is just the pool — its order doesn't matter.
Reliability score vs. Reliability Index
Two "reliability" controls live in this editor and they are not the same thing.
The reliability score powers Most Reliable. It's a score Nash calculates from each provider's past performance — completion, cancellation, and more — kept up to date on its own and computed per pickup area (roughly, the city and state where the pickup happens). You don't calculate or tune it; you opt in by choosing Most Reliable. Because it's scored per area, it favors reliable providers where Nash has history for that area — never a guarantee — and in a brand-new or unusual pickup area with none, it falls back to a random eligible provider rather than failing the dispatch.
The Reliability Index is a separate dial that appears only under Dynamic mode (covered below). It doesn't rank providers — the score is a ranking signal behind Most Reliable, while the Index is a weighting dial behind Dynamic.
Every setting, and what it does
The editor lays settings out in fixed sections, top to bottom — Strategy Info, Provider Selection, Delivery Fees, Rules, then the three Auto Reassign groups. Here's what each control does and where it starts.
| Setting | Section | Default | What it does |
|---|---|---|---|
| Strategy name | Strategy Info | empty (required) | The display name in the Active/Inactive rail. |
| Strategy ID | Strategy Info | read-only | A copyable identifier for referencing the strategy from the API or a workflow. |
| Selection mode | Provider Selection | Lowest Cost | How surviving quotes are ordered (the five modes above). |
| Allowed providers | Provider Selection | empty (at least 1 required) | The pool the mode orders. Reorder only in Manual Ranking; set percentages only in Weighted Distribution. |
| Maximum Delivery Fee | Delivery Fees | off | When on, any quote above the cap is passed over; if every quote is above it, the dispatch fails rather than overpaying. |
| Auto-Dispatch on Creation | Rules | off | Dispatch the instant the order is created, skipping customer quote-checkout. |
| Auto-Dispatch Relative to Pickup Start Time | Rules | off | Dispatch a set number of minutes before the pickup window opens. |
| Package Requirements | Rules | none | Keep only providers that support capabilities you require (proof-of-delivery photo or signature, proof of pickup, age/ID or alcohol verification, and similar). |
| Vehicle Request | Rules | any | Request a minimum vehicle type; the larger of the strategy's request and the delivery's own requirement wins. |
A few deserve a closer look. Auto-Dispatch on Creation and Auto-Dispatch Relative to Pickup Start Time are mutually exclusive, and the second doesn't apply to an order that also carries an optimization strategy. Package Requirements narrows eligibility, not just preference — a provider that can't do a required capability is dropped from quoting entirely. And Vehicle Request resolves by "largest wins" between the strategy's request and the delivery's own.
Important
For some integrations, Auto-Dispatch on Creation is fixed and you'll see "This cannot be changed for your integration." That's the integration setting the behavior, not a bug — surface it to whoever owns that integration.
The auto-reassign settings
The three Auto Reassign sections and their two extra toggles round out the editor:
| Setting | Section | Default | What it does |
|---|---|---|---|
| Auto-Reassign on Provider Cancellation | On Cancellation | off | On a provider cancel, reassign to the next eligible provider — optionally into a different strategy, with an optional "N minutes or less before pickup" constraint. |
| Smart Reassignment | On Cancellation | off | Cancel rather than retry when a further attempt is unlikely to succeed. |
| Split Batch on Provider Cancellation | On Cancellation | off | When a whole batch (a routed job) is fully canceled, split it into individual deliveries and re-dispatch each through a chosen strategy. |
| Auto-Reassign on Pickup Time | On Pickup Time | off | Reassign if the delivery hasn't advanced by your threshold. You set the minutes, before/after pickup, and which status it must still be at. |
| Auto-Reassign on Creation Time | After Creation | off | Reassign to the next eligible provider if a delivery stays unassigned longer than N minutes after creation. |
Most toggles ship off, so a fresh strategy does one thing until you turn more on: gather quotes, filter to your allowed list, order by Lowest Cost, and try the top candidates.
Auto-reassign
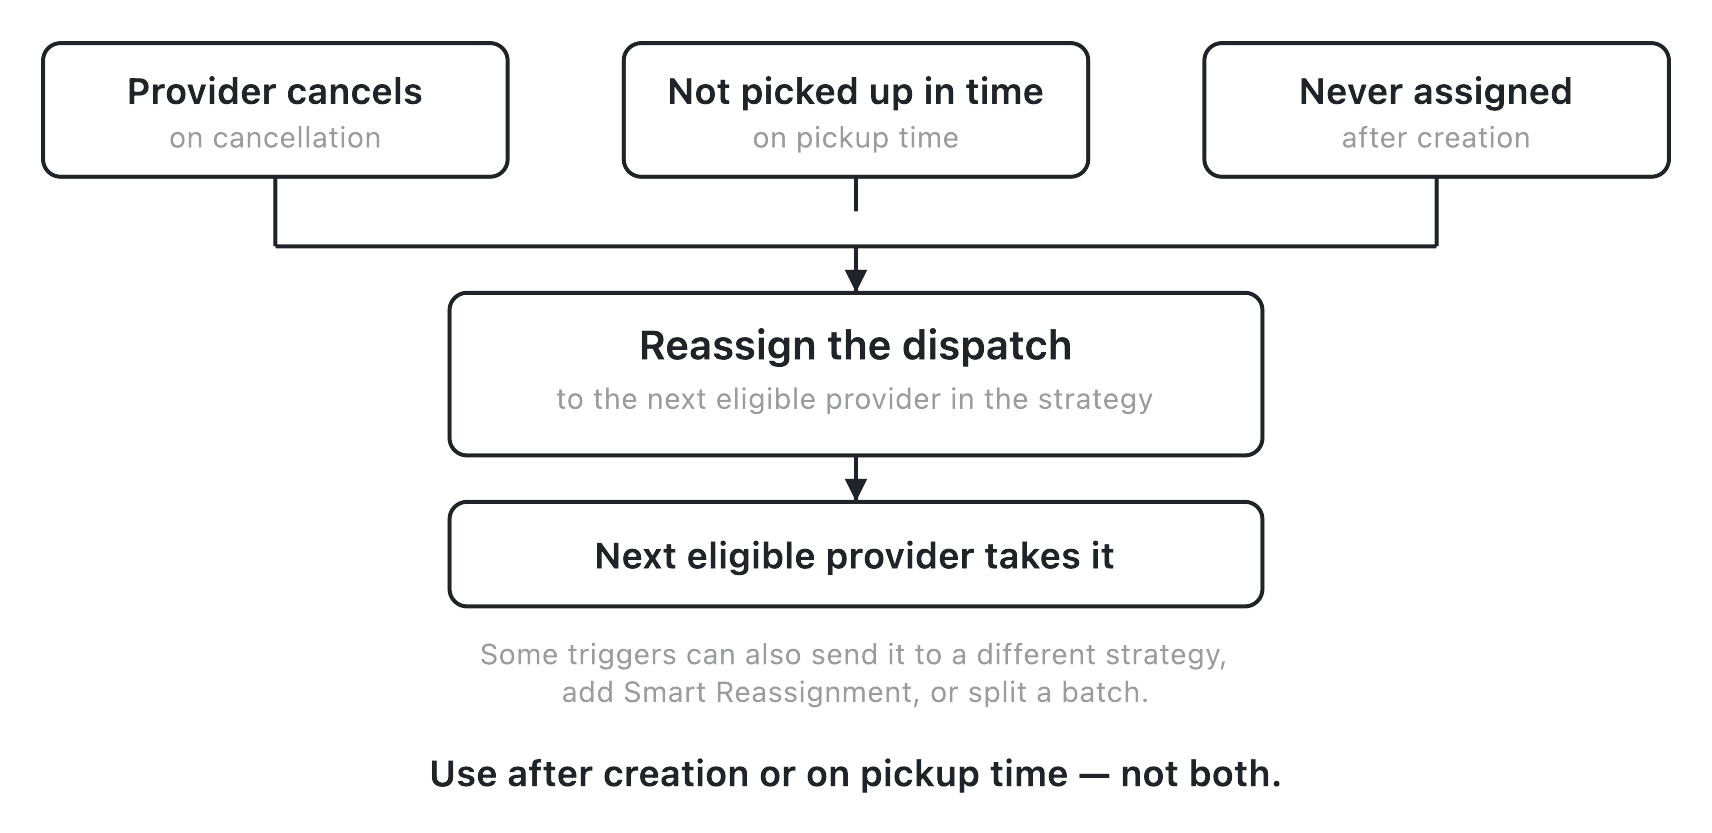
A strategy doesn't stop working once a provider is picked. Three independent triggers can hand the delivery to the next eligible provider — or to a different strategy entirely, if you've configured a fallback. Because they watch different conditions, more than one can be armed on the same strategy at once.
| Trigger | Fires when | Sends to |
|---|---|---|
| On Cancellation | The provider cancels the delivery and it hasn't already been reassigned | Next eligible provider in this strategy, or a chosen different strategy |
| On Pickup Time | Your minutes-before/after-pickup threshold passes and the delivery is still at a status you allow | Next eligible provider, or a chosen different strategy |
| After Creation | The delivery stays unassigned longer than N minutes since creation | Next eligible provider |
On Pickup Time is the most configurable: besides the minutes and before/after choice, you set which status the delivery must still be at for it to fire — for example still Assigned Driver, or still Pickup Enroute. Reassigning one already at Pickup Enroute may incur a cancellation fee, since the provider has begun committing to it.
Two toggles in the On Cancellation section shape what reassignment does once triggered. Smart Reassignment cancels rather than chasing repeated failures when another attempt is unlikely to succeed. Split Batch on Provider Cancellation breaks a fully-canceled batch (a routed job of several orders) into individual deliveries and re-dispatches each through a strategy you choose.
Important
Don't turn on Auto-Reassign on Creation Time and Auto-Reassign on Pickup Time together on the same strategy. They watch different conditions on the same delivery and can fire against each other. The form won't stop you — it's guidance — so pick the one that matches when you want a reassignment.
Be precise about what auto-reassign moves. It moves the dispatch — it hands the job to the next eligible provider — it doesn't reach into an in-progress delivery and pull it off a driver already carrying it. A reassignment that lands in a tight race with a provider just starting the delivery can still incur a cancellation fee; Nash minimizes that but can't guarantee it away. You can also point a strategy's reassignment into another strategy — A reassigns into B. Optimization strategies use that same seam for their fallbacks; how optimization strategies work owns it.
Dynamic mode and the Reliability Index
Dynamic is the fifth selection mode. Instead of optimizing for one thing — cost, your manual order, or reliability alone — it balances reliability against price together, and like Most Reliable and Weighted Distribution it's probabilistic. Its one adjustable control is the Reliability Index, a dial (default 1) that shifts how much weight reliability gets relative to price: turn it up and Dynamic leans toward reliable providers even at a higher price; turn it down and it leans cheaper.
Note
Dynamic mode is available depending on your organization's setup — reach out to Nash if you don't see it. It's part of Nash's broader automated-monitoring capabilities; see what Nash Agent is for the wider picture.
Strategy states and how a dispatch moves through one
A strategy is a saved object with a simple lifecycle. Activate and Deactivate are a reversible pause — never a delete. A deactivated strategy keeps every setting and just stops being applied.
| State | What it means | Typical next step |
|---|---|---|
| Draft / editing | Being created or changed; not yet saved | Save (needs edit rights and a valid form) |
| Active | Live; can be attached to orders, set as default, used by workflows | Deactivate to pause, or Duplicate to copy |
| Inactive | Deactivated; configuration retained but not applied, hidden from pickers | Activate to resume |
Separately, a single dispatch moves through the strategy at runtime along the "How it works" pipeline — quotes gathered, filtered, ordered by the selection mode, then the top candidates tried in turn, with auto-reassign standing by after that.
Edge cases and failure modes
Most strategy trouble is one of a handful of shapes. None of them lose the order — it stays recoverable in Needs Attention.
- Empty or over-tight allowed list. The form blocks Save with "Must select at least 1 provider," and Manual Ranking needs a non-empty list. If every allowed provider is ruled out at dispatch, the order lands in Needs Attention. Recover: add providers likely to quote the lane.
- Duplicate strategy name. Saving a strategy whose name matches an existing one is blocked with a "name already exists" error. Recover: pick a unique name.
- Fee cap too tight. Every quote comes back above your Maximum Delivery Fee, so the dispatch fails even though quotes existed. Recover: raise or turn off the cap, or add providers that quote under it.
- Weighted percentages don't total 100. The form flags "Exceeds max distribution" / "Not enough distribution" and won't Save. Recover: adjust until they sum to 100.
- Most Reliable with no history for the lane. The reliability score is per pickup area; a new or unusual one may have none, so Nash degrades gracefully to a random eligible provider rather than failing the dispatch.
- Package requirements exclude everyone. If no provider supports a required capability, quoting fails. Recover: relax the requirement or add a capable provider.
- Dynamic can't be saved yet. Dynamic relies on supporting automation that has to be ready before the strategy will Save. Availability varies by your setup — reach out to Nash.
- Auto-Dispatch on Creation is locked. For some integrations this toggle is fixed ("This cannot be changed for your integration") — expected, not a bug (see the callout under Rules).
- Reassign-into-another-strategy loops. If A reassigns into B and B's providers also fail, the chain can exhaust into a failure — Smart Reassignment is the intended guard.
- View-only access. Without edit rights you'll see "You have view access" — you can read a strategy but not Save, Activate, or Duplicate one.
- Editing a live strategy. The "used in automations" and "Linked to Optimization Strategies" panels warn that a change takes effect immediately. To test safely, Duplicate the strategy and edit the copy.
- Deactivating a still-referenced strategy. Deactivation is a pause, not a delete, so references survive — but a paused strategy won't apply. Recover: reactivate it, or point the order/workflow/default at an Active one.
Tip
When a dispatch surprises you, first check whether the provider you wanted was ever eligible — the strategy can only order quotes that actually arrived. A missing provider, coverage gap, or contract that ruled the order out lives one layer out, in how dispatch works, not on the strategy.
What affects this
None of the following live on the strategy's own selection mode, but each shapes what the strategy has to choose from, or how it chooses.
| Object | Where it's set | What it does here |
|---|---|---|
| Allowed providers & selection mode | The strategy itself — see dispatch strategy settings | Which providers are in the running, and how the strategy orders or weights them |
| Providers & contracts | Control ▸ Providers — see manage providers | Set which providers can quote and at what price — a provider missing from the eligible pool never reaches the strategy at all |
| Zones & coverage | Control ▸ Zones — see manage zones and define zone coverage | Decide who's eligible for the order's pickup and drop-off, which feeds the pool the strategy orders |
| Reliability score | Nash-computed, per pickup area | Ranks providers under Most Reliable and feeds Dynamic's balancing act |
| Your org's default strategy | Settings ▸ Preferences — see set organization defaults | Which strategy applies to an order that doesn't name one directly |
| Workflows | Orchestrate ▸ Workflows — see workflows and build a workflow in the portal | Assign a strategy to matching orders automatically, based on conditions you define |
| Optimization strategies | Orchestrate ▸ Optimization Strategies — see how optimization strategies work | Name a dispatch strategy as their unassigned-orders fallback, and per contract |
Two strategies that look identically configured can behave differently when the providers, contracts, or zone coverage behind them differ. One thing stays constant throughout: Nash dispatches the work and hands it to a provider or your own fleet to carry out — the strategy chooses the handoff, not the drive.