How the driver app works
Last updated: October 7, 2026
The driver app is the tool you use in the field to run the work your operator's own fleet is carrying. It's separate from the portal your operator uses to plan and dispatch: they set up the fleet and send you the work; you sign in on your phone and carry it out. Everything underneath follows one shape — you go on shift, get work, go to a place, do what's needed there, and mark it done — whether that work arrives as a single delivery or one leg of a longer route. Hold onto one thing throughout: Nash dispatches the work and the app puts it in your hands, but you — the operator's own fleet — perform the delivery.
Note
What you see on your screen depends on what your operator has turned on. Some of what's described here — certain proof steps, in-app navigation, the ability to skip or decline work, earnings — is available depending on your setup. If something doesn't match your screen, that's expected; reach out to your operator or to Nash.
How it works
The driver app is a thin front end over a server that keeps the real record. You never edit a status directly — you tap a button (Start, Arrived, Complete, Skip, Cancel Delivery), the app sends that request up, and the server checks it against the rules for what's allowed next before moving anything. If the move is legal, the server advances the stop, pushes that change onto every delivery riding on it, and lines up the next. That's why the app almost always agrees with the portal your operator is watching — you're reading the same source of truth.
Before any work reaches you, two gates come first. You sign in — by email or phone, with a code, no password — and clear the device permissions the app asks for: location, camera, and notifications. Location can be a hard gate: if your operator requires it, the app won't let you work until you grant it, because so much downstream leans on knowing where you are. Multi-org drivers switch organization in Settings. From there, the mechanism is a loop wrapped in a shift.
You go Active. Availability is one toggle in the header — green Active, red Inactive, with a "Status changed successfully" toast. That toggle is your clock-in and clock-out; there's no separate scheduling screen and no in-between state. Try to work while Inactive and the app shows "You need to be Active…" with a Mark as Active button that flips you and carries on. If your operator has set up a form for going Active, it opens first — you become Active once you submit it, and then retry what you were doing (see fill out driver forms).
You see and accept work. The home screen has two tabs, each with a count: New (work waiting for you to take — empty state "No new orders to accept") and Active (work you're already running — empty state "No orders assigned to you"). The list refreshes about every 30 seconds. How work arrives depends on your setup — sometimes it's simply assigned and already in Active, sometimes it needs an Accept tap, and sometimes it arrives as a timed offer with a countdown ring that expires. Accepting moves work into Active; where your setup allows it, you can also Unassign a delivery back to the pool (not to a specific driver).
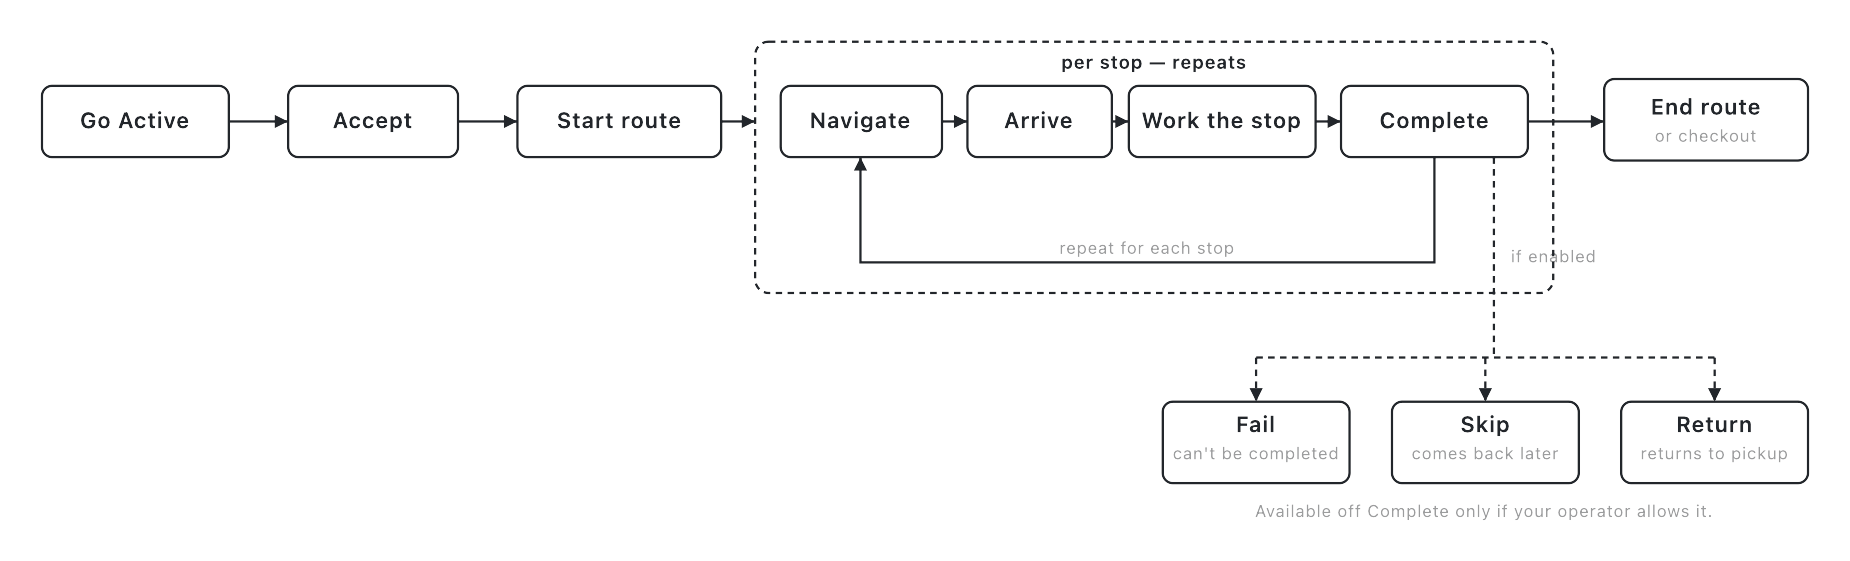
You run the route, stop by stop. Your work for a shift is grouped into a route — a map plus a list of stops in the order the server hands you, with route-level figures (ETA, distance, time, weight) and a Start Route control. You tap Start Route once, and the server drives the sequence: it puts the first stop en route, and each time you finish or fail a stop it sends you to the next. You work the active stop; the next appears. A route can carry more than one pickup — a second load collected partway through, say. Each drop-off then waits on the pickup that carries its packages, not on every pickup, and the later pickup stays locked until the stops ahead of it are finished.
The app keeps working when your signal doesn't. Every state-changing action in the routes flow runs through an offline layer: with bad signal it's held on your phone and sent automatically when signal returns, so you keep moving through a dead zone and see a "pending sync" marker rather than an error (more below). Account, settings, and profile changes are the exception — they need a live connection.
Running a single stop
Every stop runs through the same small loop: navigate to the address, tap Arrived, tap Start to begin working it, confirm the items and capture whatever proof the stop requires, then tap Complete. Those taps walk the stop through its lifecycle one step at a time. See accept and start your work and run a stop from pickup to dropoff.
Tapping a stop's address starts navigation, and which experience opens is your operator's call. Some setups use turn-by-turn directions inside the app (where reaching the address often fires your arrival); others hand you off to the maps app, where you pick a default in Settings or Always ask each time.
Each pickup and drop-off also carries its own timing, separate from the route-level figures. Open a stop and you see its Pickup window or Delivery window and, when there is one, an Estimated arrival. On some setups the app shows a fuller picture instead: the stop's planned Window next to a live Estimated arrival, in your route list as well as on the stop itself. On a drop-off it also tells you where you stand against the plan — On plan, or how many minutes behind — and if the estimate lands past the end of the window it turns red, the stop is tagged At risk in your route list, and the app shows how many minutes outside the delivery window you're projected to arrive. Once you finish the stop, the timing is replaced by Completed at and the time.
Note
The planned-window and at-risk timing view isn't on for every organization — availability varies. If your stops show only a window and an estimated arrival, that's expected; your operator can reach out to Nash for access.
Working the items is the other half of a stop. Each item has its own state — waiting, then picked, then delivered, or failed or missing. You check items off (and barcode-scan them where the stop calls for it); scanning isn't a gate of its own, but the item list is: Complete won't enable until every item is resolved. Where your operator allows partial delivery, you can fail specific items rather than the whole order; anything undelivered is carried back as a Return.
Capturing proof of delivery
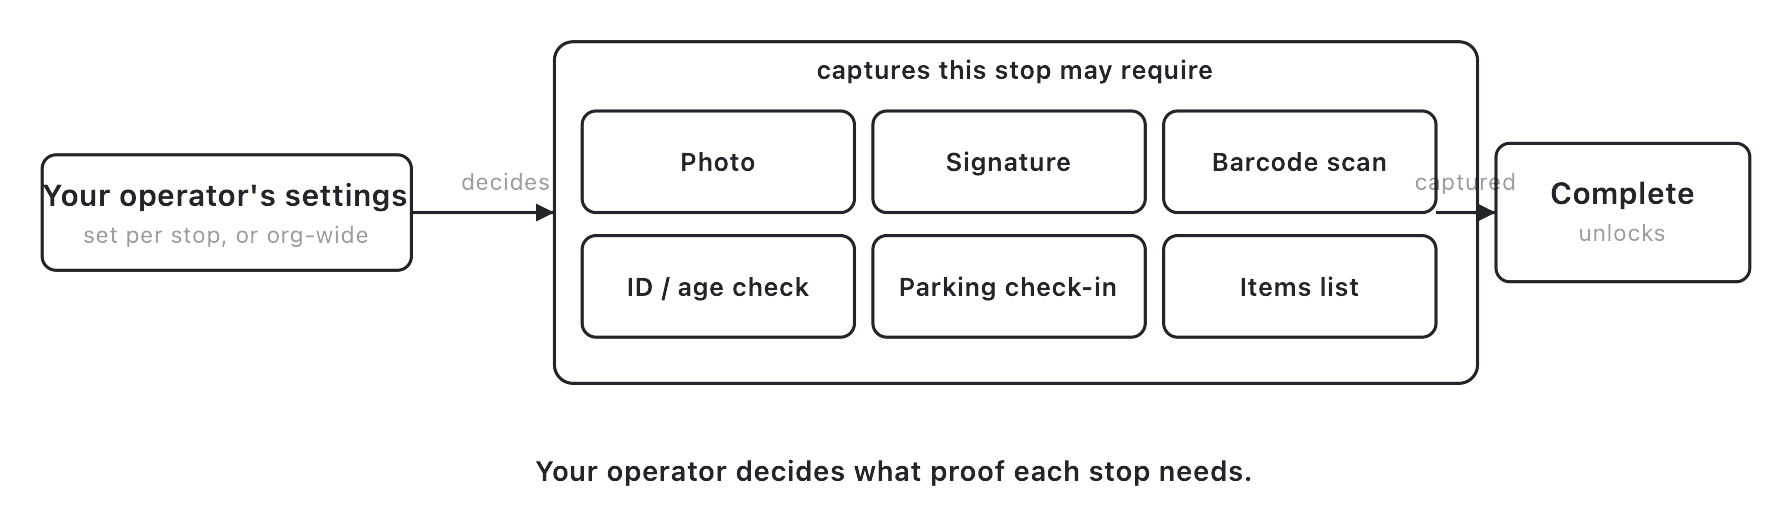
You don't choose what proof a stop needs. Your operator decides, stop by stop, what proof each stop requires — the app resolves that into the exact tiles you see, and you satisfy them. There are a handful of capture types, though a stop usually asks for only one or two:
| Capture | What it is | Blocks Complete? |
|---|---|---|
| Photo | Of the package at pickup (proof of pickup) or the completed drop-off (proof of delivery), taken live with the camera | Yes, when required |
| Signature | Signed on screen by whoever hands off or receives the package | Yes, when required |
| Barcode scan | Checks an item off the stop's list; folded into confirming items | Via the item list |
| Notes | A free-text tile, always shown | No — always optional |
| ID or age check | Required on age-restricted stops or items | Yes, when required |
| Parking check-in | Logging your parking spot number when a stop asks | Yes, when required |
Two drop-off situations change what's required on the fly, when your operator allows them. Marking a package Leave unattended makes you pick a reason and forces a delivery photo (and is blocked on a stop that must be handed to a person); an Other recipient makes you record their name and forces an ID check. The full breakdown lives in capture proof of delivery and the proof of delivery reference.
Important
The Complete button stays greyed out until every required capture for the stop is done — a missing photo or signature, an uncleared ID check, unactioned items, or an unlogged parking spot all keep it locked. Notes never block, and there is no way to skip a required capture.
Your settings vs your operator's settings
Almost everything about how the app behaves in the field is set by your operator in the portal, and it all lives under the portal's Fleet section. What you actually configure in Settings is short: your name, language, default navigation app (or "Always ask"), and vehicle info (type, year, make, model, plate, color). Your phone number is read-only, set when you're invited; the rest of Settings is view or utility actions (order history, updates, switch organization, log out).
Keeping the app up to date. When a newer version of the app is available in your phone's app store, the app shows an Update recommended dialog with the new version number when you open it or come back to it. Tap Open App Store (or Open Play Store) to update, or Not now to dismiss it — it comes back the next time you fully close and reopen the app. Update before you start your next route: an out-of-date version may not record your deliveries correctly.
Where your operator sets the rest. Two layers, worth telling apart:
- Fleet ▸ My Fleet is the org-wide home for driver-app behavior — one settings form in five categories: Assignment, Pickup & Delivery, Navigation, Communication, and Route Card Display (around three dozen settings). What's set here is the default for every driver.
- Fleet ▸ Driver Groups holds a smaller per-group override: a handful of those settings can differ for one group, and anything not overridden keeps the My Fleet value. Your driver group is also where your operator can require a photo or signature across the group, on top of any per-stop rule.
Both of these — and the whole Fleet section — are available depending on your setup.
What that configuration changes for you — again, available depending on your setup — covers most of your day: how work reaches you; which of Decline, Unassign, Skip, and Cancel (fail) you can use; how navigation works; what proof each stop requires; the completion options; what the stop list and cards show; and the communication tools. Two are worth calling out: the earnings report is double-gated (reporting on and a driver group with pay rules), so many drivers never see it; and the vehicle and route exception flows (Request Refuel, Report Breakdown, Report Overweight, Report Oversize) appear only if your operator has turned them on for your organization. You don't build any of this — the app is where it becomes action.
Statuses and transitions
A few small state machines run underneath the app. You never see their names, but their shapes explain what you do see — and why a button is or isn't there. Availability, above, is the simplest: Active or Inactive. Each stop and route run through the two here.
Each stop moves through its own lifecycle. The server allows exactly the next step, so the available button matches where the stop is:
| Stop state | What it means | Your action | Where it goes |
|---|---|---|---|
| Pending | Queued in the route, waiting its turn | (auto) route start or the prior stop closing sends it en route | En route |
| En route | The active stop — you're driving to it | Tap Arrived | Arrived |
| Arrived | You're at the address | Tap Start | In progress |
| In progress | Working items and capturing proof | Tap Complete (only once every required capture is done) | Completed |
| Completed | Stop finished; the next pending stop goes en route | — | Route advances |
| Skipped | Passed over for now, not failed | Tap Resume | Back to En route |
| Failed | Could not be completed — terminal | — | Order fails; items may return |
One rule on that table trips people up: Skip is reversible and Fail is terminal. Skipping parks a stop; resuming it prompts "Delivery Previously Skipped… resume?" and puts it back en route (resume is the reattempt). Failing is the end of the line.
The route has a matching shape, and the server only accepts stop actions while the route is live and dispatched — one that hasn't started, or is already finished or canceled, won't take stop taps at all:
| Route state | What it means | Next step |
|---|---|---|
| Not started | Assigned or accepted, not begun | Start Route |
| In progress | You're working the stop sequence | Work each stop in order |
| Break | On a mandatory rest break | End Break, then resume stops |
| Completed | All stops done | End Route, then checkout |
Held-up actions, when you're offline, go pending, then syncing, then cleared — or failed if the server rejects one, and only a failed action can be discarded by hand. And every tap ripples down to the customer's tracking — pickup en route, picked up, drop-off en route, dropped off — so the person waiting sees it move as you work.
End of route
After the last stop, checkout shows All Orders Completed! and, depending on your setup, asks for an end-of-day odometer reading and a quick feedback drawer — a wrapper around the finished route, not where proof is captured. Any check-in form your operator built appears at the start of a route, not here; you fill it in, you don't design it — see fill out driver forms.
Edge cases and failure modes
Real shifts don't always go down the happy path. Here's what breaks and how to get back on track.
You lose signal in the middle of a stop. Your action is held on the phone, the stop shows "pending sync," and you keep working; it sends itself when signal returns. If the server later rejects something you did offline, the stop does not flip — a failed row appears in the sync list, which you can retry or discard.
You try to complete too far from the stop. When you tap Complete, the app checks how far you are from the address. Beyond about 50 meters it warns you — "delivery is too far" — with the measured distance and a Yes/No. This is a warning, not a wall: you can tap Yes and complete anyway (a large complex where the pin is off), but the best fix is to get closer. That distance is fixed, not something your operator can tune.
Tip
If Complete is greyed out, don't fight the button — scan the stop for the tile or item that isn't finished. The button unlocks the instant the last required capture turns green; a blank Notes tile is never what's holding you up.
A timed offer runs out. When an offer's countdown reaches zero the card disappears and the work is re-offered to someone else — not an error, just a missed offer.
A stop is locked behind another one. A drop-off stays locked until the pickup that carries its packages is done — the stop shows Pickup must be completed first. On a route with more than one pickup, a later pickup stays locked until every stop ahead of it is finished (Complete the previous stops first), and any pickup or drop-off that sits after an unfinished return stop waits for that return (Return must be completed first). A skipped stop doesn't count as finished — resume it and close it out to unlock what's behind it.
You have to fail a stop. Fail lives under Cancel Delivery in the stop's overflow menu and opens a Select Failure Reason drawer. The reasons are fixed in the app and vary by stop type — shared ones like Package Damaged, Package Not Found, Severe Weather, and Other; Other needs a note of at least five characters. Failing is terminal and fails the whole order for that stop — no partial fail, no reattempt. Carried items become a Return, except when the reason is Package Not Found, which leaves nothing to return. To pass on a stop for now instead, Skip it and resume later.
A required permission is denied. Denying required location blocks the app entirely until you grant it in your phone's Settings; denying the camera blocks photo proof, so a stop that needs a photo can't be finished.
You can't see assigned work, or can't go Active. Usually work is waiting on acceptance you haven't given, you're signed in to the wrong organization (multi-org drivers switch org in Settings), or you haven't been invited yet — see driver cannot see an assigned job and driver cannot log in to the app. Rarely, a route won't advance because the work behind it changed on the operator's side after it was sent — that's a server-side problem to flag to dispatch.
You hand the device to another driver. Logging out, or a different driver signing in on the same phone, wipes the held-up action queue and warns you if anything's pending — let your work sync first, or it's lost.
What affects this
Most of what shapes your day is standing configuration your operator set in the portal, not something you touch each shift — all under Fleet. Here's what each does for you in the field.
| Object | Where it's set | What it does here |
|---|---|---|
| Fleet settings (My Fleet) | Fleet ▸ My Fleet — see fleet settings (My Fleet) and the reference | The org-wide defaults for the whole app: acceptance, action availability, navigation, completion options, and what your cards and stop list show |
| Driver App Settings (per group) | Fleet ▸ Driver Groups — see driver group settings | A per-group override of a handful of those settings; anything not overridden keeps the My Fleet value |
| Your driver group | Fleet ▸ Driver Groups — see manage driver groups | The group you're in, plus the group-level force a photo or signature rule, on top of any per-stop proof requirement |
| Forms | Fleet ▸ Forms — see manage courier forms | The check-in forms at the start of a route — your operator builds them, you fill them in |
| Vehicles | Fleet ▸ Vehicles — see manage vehicles | The vehicle record your fleet keeps; your in-app vehicle info sits alongside it |
| Shifts | Fleet ▸ Shifts — see manage shifts | When you're scheduled to be on; going Active is your clock-in against it |
| Pay | Fleet ▸ Driver Pay — see manage driver pay and pay reports | The pay rules that decide whether an earnings report shows and what's in it |
| Training | Fleet ▸ Training — see manage training | Courses and skills your operator assigns your fleet |
| Your invite and setup | Fleet — see set up the Nash driver app | How you got access — the operator side of getting you onto the app |
Note
Some of these settings live in areas that are available depending on your setup — the whole Fleet section, and the org-wide My Fleet settings home in particular, may not be turned on for every organization. If you or your operator can't find one, reach out to Nash.
For the wider picture, see how the fleet works, how routes work, and how deliveries work; and in the app, the driver app overview, get started on the driver app, and driver availability and status. Through all of it the division holds: Nash dispatches the work, but the delivery is yours to carry out.